May 14, 2012

Jars/Vases

 Hello again!  Where did  the days go in between  my posts?  Well, I  have been busy making things for a the booth I share with a friend.   There is always housework, cooking and just everyday happenings that have kept me from blogging.  I will throw dealing with allergies in there and I guess I can account for the days.   

I saw these cute vases on Pinterest a couple of months ago so I decided to make a few of them.  A recycled glass jar, a bit of burlap tie it up with a  ribbon bow and I have a few items to add to the booth.   A friend is opening a thrift/consignment store in a few weeks.  I have been making things for there as well!  Busy! Busy!  Sneeze! Sneeze! 

Thanks for visiting!

April 30, 2012

Bird refrigerator magnets

 I have been in a creative mood lately.  It might be that the sun is shining and that always helps with my creativity!   I can not shake my love for making paper birds!  The other day I made a bunch of them.  I know I will use them sooner or later so when I make them I like to make more than one.

 Not an original idea but I put the bird on a clothespin.

 I took it a step further and glued a magnet on the back of the clothespin.

There you have it, a bird refrigerator magnet.  


 Thanks for visiting!

April 27, 2012

Let's make some pinwheels!

 Pinwheels! Pinwheels!  Pinwheels!  
 I made a few last year to put in my outdoor potted plants!  
 They were fun to make so I decided to make a few more today!
 This year I was inspired by www.missmustardseed.blogspot.com to use old pieces of sheet music.  I think she used pages from a children's book.  You will need paper cut into 5 inch squares.
Next, you will need to draw an x  to find the center.

  Cut into the x  stopping about an inch from the center.
 Put a dab of hot glue in the middle and start making the pinwheel.
 I put a small button in the middle to hide the glue.  You could cut out a small circle from a piece of paper if you do not have any buttons. 

 I used long wooden skewers for the sticks.

 I can say these are fun to make!  I need to make more!  I might  be taking the plunge and selling my paper crafts at a local store.  A friend and I love to craft so we will be sharing a booth.  We are on a waiting list right now.  But it is a step in the right direction.  I hope it is!

Hopefully,  I will be busy making all sorts of fun things!
  
Thanks for visiting!

April 20, 2012

Strawberry, Balsamic Vinegar and Cheese Flat bread

Where do I begin?  I make a lot of pizzas.  My husband brings home a bag of bread/pizza dough every Sunday, every Sunday!  If I don't make a pizza, I  just put the dough in a 9 x 9 pan and bake it for 25 minutes at 375  and lo and behold I have a square loaf of bread!  But yesterday I was adventurous! I had to try and make a strawberry flat bread.  In my mind if it does not have tomato sauce on it, it can not be pizza.  

 This  dough is from Whole Foods, it is a dream to work with it practically spreads it self into the pan! 
 I layered baby spinach, cut up strawberries and fresh mozzarella cheese on the dough.  Drizzled balsamic vinegar and honey on top of that.   

 Baked it for 17 minutes at 400 degrees.   

 
 After I tried my first piece, I thought it was lacking a little something.  I found a bottle of Italian seasoning and sprinkled that on top. That was an improvement, but it still needed something.  I found a bottle of balsamic glaze and drizzled that on top.  That was it!    And I think  the balsamic glaze makes it look very pretty!   I found that the longer the flat bread sat, the better it tasted.    Next time I will remember to use more herbs and maybe I will use regular spinach and not baby spinach.  Maybe even omit the strawberries and use mushrooms, olives and peppers.   I think I will try that next week!  

 Thanks for visiting!
  

April 18, 2012

A gift for the happy couple

 I wanted to share a little something I made for a recently  engaged couple.   Two tomato sauce jars that I mod podged  with white tissue paper.  The paper has a little glitter in it, just enough sparkle!  I love the two large red hearts!  I almost forgot to mention that they can hold a tea light candle.  They look so pretty when the candles are lit.  

The jars looked a little boring with just the tissue paper.  Maybe, not enough sparkle.  I added a pretty cream colored ribbon and two paper hearts.  I love how the buttons added a  little bit of something to an ordinary paper heart.  


On the back of the blue heart I added the date of their engagement.  
 It wasn't a very expensive gift, but I hope they like it.

Thanks for visiting!


April 16, 2012

Chalkboard

 I have a small obsession with chalkboard paint.  A few weeks ago I set out to find an old frame that I could use to make a chalkboard for my daughter.  With a little help from a friend I was able to find this framed blue print.  I felt  bad painting over the blue print.  Someone was proud enough of their work to have it framed.

 I put three coats of paint over the print.   I had to do a bit of sanding in between coats to get rid of some of the bubbles that formed in the paper. It dried practically perfect!  It is an old piece so I wasn't  really going for perfect anyway.  Works for me!

This greeted my daughter when she came over for her birthday dinner.  Let me just tell you,  it was very hard for me to let  the chalkboard go !  She said I could keep it, but I made it for her and I know it will look great in her apartment!    It gives me something to look for when I am out there thrift store shopping! 
  
Thanks for visiting!

April 13, 2012

Jars

I love this  easy project and I had to share it.    

 People have been reusing glass jars for years, me included.   The other day I decided to paint the cover.  I wanted the cover  to look a little time worn, old.   I painted the cover  tan and then went over it with bright green.

 It was nice but boring! I cut a piece of floral paper and then  mod podged it in place. 

   There you go a cute jar filled to the top with colorful paperclips!  
I love an easy project!  
  
Thanks for visiting! 

April 11, 2012

 My brother recommended that I try this tea.  I  am glad he did because it was very good.  I am a coffee drinker,  but I do enjoy a good cup of tea now and then. 
  
 Not only did I like the tea, but I really liked the tin.  My daughter recently  told me she  also liked old tins.   This will be one  of her birthday presents. I could not wait for it to distress naturally, so I did it myself.    A little sanding and a little paint brushed on here and there and this is the tin today!   

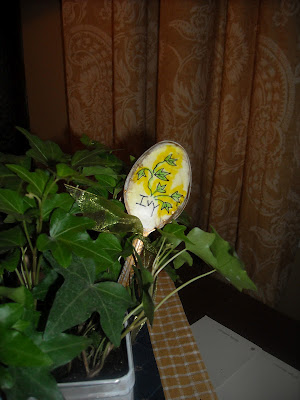
I added a small ivy plant and made a small sign from  a spoon.  I found the spoon  idea on Pinterest. I hope to do a post on that project soon.  

 Thanks for visiting!

April 10, 2012

Spring is in the house

 A friend of mine gave me a bunch of mini composition notebooks.
They have been sitting in a drawer waiting to be papered.

I covered the front and back of the journals with colorful  paper.  I found a paper that looked like seed packets.  They make me wish it was warm enough to start planting flowers.  But, it is still too cool here in New England!   

I added a piece of sheer ribbon and a white button.  They really do make me want to look out my windows and see flowers!   Have you planted any flowers yet? 
    
   
Thanks for visiting and looking at yet another paper project!

April 9, 2012

Let's Make A Plate Stand!

After I found so many of these posted on Pinterest I knew I had to make one!  

I had a few of these glass candlesticks. 

 I sprayed the candlestick outside in the yard. We do not have a lawn right now, so I did not have to worry about any of the paint showing up on the green grass. 

I love these sample size paints!  Just the right size for all my small projects!  I painted this pretty gray color over the primer. 

I then  painted  a bit of brown glaze over the gray paint.  I really the gray distressed look that is so popular in decorating  right now!  As I type this, it might be out of style!  Things change so fast now!  

   
  I let it sit for a day before I glued the candlestick to the bottom of the plate.

I did a little research and found that this glue had a lot of good reviews.  I put a thin layer on the candlestick and eyeballed where I thought the center of the plate was.  Let it sit for 24 hours.

This is the finished plate stand.  I want to make more!  I have a few more glass candlesticks. I am now on the look out for cheap plates!   

 Thanks for visiting!